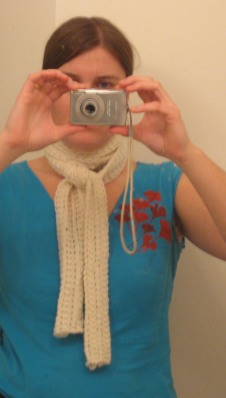
So I had decided that as part of my knitter’s development it was time to knit a shawl.  Note, this is not a stole, but an authentically ‘get your granny on’ triangular shawl.  Though this undertaking involved the obvious danger of looking ridiculous, I had seen many photos of hip young people wearing shawls such as this like scarves, and figured I could pull it off!  So I dyed some recycled cashmere, and eventually cast on!  Laminaria (a free pattern from Knitty.com) was an absolute joy to knit, and I got through it in 4 days!  I took the ferry from Vancouver to Victoria and got a lot of knitting time in both ways, so that helped.

My husband and I had to sleep on the couch one night so that I could block the shawl out on our futon!!  The yarn is approximately fingering weight, and I used a 5mm needle, and it required approximately 500 yds.

unblocked shawl

Pattern: Monkey by Cookie A., published on knitty.com winter 2006 issue
Yarn: Plymouth Yarn Happy Feet – 75 grams used
90% superwash merino wool / 10% nylon, 50 grams / 192 yds / skein
Needles: US0/2.0mm Knitpicks circular (47″ length)
Size: women’s 8.5-9
Started: December 31 2008
Finished: January 11 2009

The fact that I’ve knit 2 pairs of the same socks in such a short amount of time testifies to the fact that this is a GREAT pattern.  It is the right size, and it’s fun, and not boring to knit.

As for the yarn, Happy Feet is soft and pleasant to work with, and the subtle variegations allow the lace pattern to show through beautifully.  It is a 2-ply, and I didn’t have any problems with splitting.  I believe it will fuzz and pill relatively quickly, but I don’t really have a problem with that.  I am also pleased that this pattern, with such small needles, makes perfectly fitted socks for my feet, and since I used slightly less than 75 grams, and have ~26 or 27 grams left, I will be able to get another pair of socks out of the yarn if I buy 1 more ball, which will make the projects quite affordable.

Pattern: Monkey by Cookie A., published on knitty.com winter 2006 issue
Yarn: Fibranatura Yummy – 100 grams used (284 yds)
100% superwash wool, 130 grams / 370 yards / skein
Needles: US 1/2.25mm Knitpicks circular (47″ length)
Size: women’s 8.5-9
Started: December 16 2008
Finished: January 21 2008

This pair were knit first, and I loved knitting them so much that I had to knit the second pair!  The yarn is lovely, plump and seems very hard-wearing and durable so far.  I’ve worn and washed them at least 5 times, and with use they become a little fuzzy, but still look and feel really good.  I love how the yarn is plumper than the average sock yarn, which I found more pleasant both during the knitting process, and as it creates a slightly heavier, dense sock.

HANDSPUN FINGERLESS GLOVES:

These are really easy, fast and satisfying. They’re a great project that takes very little yarn, which is good for a beginner hand-spinner.

Size:
These were designed to fit a fairly average female hand measuring 7 1/2″ to 8″ around just above the thumb.
Yarn:
Any yarn that will allow you to make gauge will do. I’ve used a combination drafted hand-spun single that is 11 WPI (wraps per inch), and looks like somewhere between DK and sport weight. I used about 110 yards, but your yardage may vary depending on the row gauge you get.
Gauge:
4.5 sts / inch, 8 rounds / inch in stockinette stitch on US #6 needles (or size to obtain gauge)

I knit these gloves on a long circular, using the magic loop method. They could just as easily be knit on double pointed needles.

HAND:

CO 30 sts.

Place marker at start of round, and work 15 rounds (@2″) in *K2, P1* rib. (30 sts)

Knit 10 rounds knitting all stitches. (30 sts)

To increase for thumb, alternate these 2 rounds 4 times:

Increase round A: K2, inc 1, K to last 2, inc1, K2
Increase round B: Knit

Now there will be 38 sts on the needles.

Now knit around to last 3 sts. Drop live yarn, and using scrap yarn, knit the next 3 stitches (to end of round), then the first 3 stitches of the next round, so you have 6 stitches knitted in the scrap yarn. Then transfer these 6 scrap yarn stitches back onto the left-hand needle, and pick up the live yarn, and knit over these scrap yarn stitches again, using the live yarn. Finish this round knitting straight. (38 sts.)

To decrease after thumb, alternate these 2 rounds 2 times:

Decrease round A: K2tog, Knit to last 2, SSK
Decrease round B: Knit

Now there will be 34 sts on the needles.

work 10 rounds (@ 1 1/2″) in *K2, P1* rib. (34 sts)

Bind off using decrease bind off:
K2tog through back loops, put the stitch created back on LH needle, then K2tog tbl again, … etc.

THUMB:

pull out scrap yarn, and put the 11-12 live loops created onto needles.

1: With new yarn, starting by working across bottom loops (closest to the wrist), knit 6, knit up 3 stitches in gap between bottom and top stitches, then knit across 6 top stitches, then knit up 3 more stitches in gap between top and bottom stitches. (18 sts.)

2: K10, K2tog, SSK, K4 (16 sts)
3: Knit

Knit 7-8 more rounds even, then BO using decrease bind-off (described above).

FINISHING:

Knit second glove same as the first. Weave in ends, block if you find it necessary, and enjoy!!

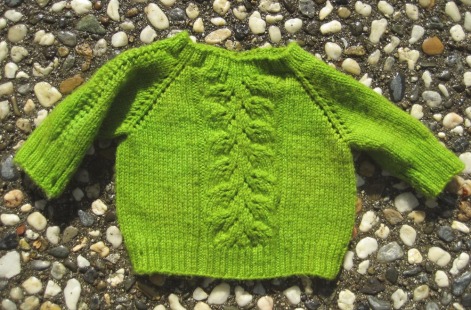
rubysweater-1

By Emily Wessel

This pattern is inspired by the excellent top down raglan pattern by Fran at martian mischief.

FITS:
Infant 6-12 months
Underarm = 19.5”, sleeve length = 8”

GAUGE:
5.25 st/inch (21 st = 4”) on US 5 needles in stockinette stitch

NOTE: if working with a different gauge, just make sure that neck hole is large enough (stretches to 18”) and just work to the right underarm dimension, and the sleeves will automatically be wide enough.

NEEDLES:
US 3 circular or DPN’s (for ribbing) and US 5 circular or DPN’s (for body)

The pattern starts at the neckline and works down, increasing along the raglan ‘seam’ lines, until there are enough stitches (at the underarm) to join the front and back panels together, and split off the arms and then work down the front and back and arms from there to the waist / wrists.

If a larger sweater is desired, simply continue the pattern for longer before splitting arms off, and this will result in a larger underarm dimension, and wider sleeves. Then simply knit to the desired length in body and sleeves.

YARN: I used Knitpicks Bare Superwash Merino, which is the undyed version of their Knitpicks Swish DK yarn. It is a DK weight yarn (246 yards/100 gram hank). The sweater used 1 hank plus a very small amount more (300 yards would definitely be enough). It is very soft and spongy, and the washing instructions suggest Machine Washable/Tumble Dry Low. After knitting, I hand dyed it using Wilton’s Icing Dyes (leaf green, plus a little bit of red)
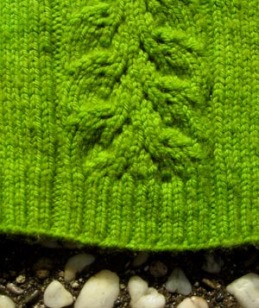
rubysweater-centrelace

LARGE LACE PANEL (center front and back):

Over 21 stitches (knit on the round)

R1: P2, K3tog, K2, yo, K1, yo, K3, yo, K1, yo, SSSK, K4, P2

R2 and all even rows: P2, K17, P2

R3: P2, K10, yo, K1, yo, K1, SSSK, K2, P2

R5: P2, K4, K3tog, yo, K1, yo, K3, yo, K1, yo, K2, SSSK, P2

R7: P2, K2, K3tog, K1, yo, K1, yo, K10, P2

R8: As R2.

Repeat these 8 rows for pattern.

SMALL LACE PANEL (along arm):

Over 5 stitches (knit on the round)

R1: K2tog, yo, P1, yo, K2tog through back loops

R2: Knit all stitches

Alternate these two rows.

* I find that to make even yo’s with this pattern, it is necessary to loop over twice in each case, and then in the following row, only knit into one of the two loops formed. I don’t know why, but I think it has something to do with transitioning from a purl to a knit stitch with a yarn over between.

** I found that this lace pattern ends up being depressed, so I actually suggest that you choose a different 5-7 stitch lace pattern to use on the arms, and swatch to make sure that you like the effect before starting the sweater.

KNITTING SWEATER:

Cast on 66 stitches on smaller needles, join to work on round.

Work 8 rounds in K2, P1 rib.
Switch to larger needles.

Place different colour marker at start of row, K11, place marker (this will be right arm), K22, increase 1, place marker (this will be front panel), K11, place marker (this will be left arm), K22, increase 1 (row count now 68, with 11 st each per arm, and 23 st each in front and back panels)

START LACE PATTERNS & INCREASE ROWS:

From neckline ribbing to underarm, alternate rows, working one ODD row incorporating odd lace pattern rows (rows 1,3,5, or 7 of lace patterns specified above) then one INCREASE row, which will add stitches along the raglan ‘seam’ lines (during which you will knit all stitches across the lace panels).

Odd Lace Row:

K6, work small lace pattern over center 5 sts, K6, slip marker, K1, work large lace pattern over center 21 sts, K1, slip marker, K6, work small lace pattern over next 5 sts, K6, slip marker, K1, work large lace pattern over center 21 sts, K1

Increase Row:rubysweater-yoke
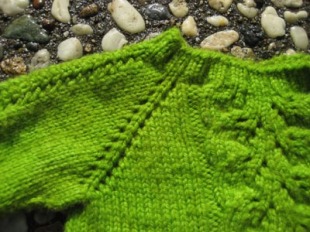
K1, yo, K to last 1 st before marker, yo, K1, slip marker, yo, knit until lace pattern, then P2, K17, P2, then knit until marker, yo, slip marker, K1, yo, knit to last 1 st before marker, yo, K1, slip marker, yo, knit until lace pattern, then P2, K17, P2, then knit until marker, yo, slip marker. (this increases 8 sts)

Alternate these two rows until front and back panels measure 9 ½” wide (for me this was when front and back panels had 49 stitches).

Put right sleeve stitches on scrap yarn, cast on 3 stitches, work across front panel, put left sleeve stitches on scrap yarn, cast on 3 stitches, and work across back panel.

Work body even from underarms to desired length minus ribbing (about 8” from shoulder). Work in K2, P1 ribbing to desired final length (about 9-9 ½” total from shoulder) – *across lace panels, to maintain purl columns, work P2, then *K2, P1* for 17 sts, then P2*. Bind Off all stitches.

SLEEVES:

Put stitches from holders onto 2 circulars or DPNs

Start round at back of sleeve, knit around, maintaining lace pattern, and pick up and knit one stitch for each cast on stitch at underarm, plus 2 extra stitches, one on either side of picked up stitches.

Work even (or decrease a few stitches as desired) until desired length minus ribbing (about 6” from shoulder). Switch to K2, P1 ribbing, and smaller needles, and work to desired length (about 8” total from shoulder) (* across lace panels, for symmetry, work P1, K3, P1*) note, that to achieve correct multiple for ribbing it may be necessary to decrease a stitch or two.

FINISHING: Weave in yarn ends, wash, dry, and enjoy!

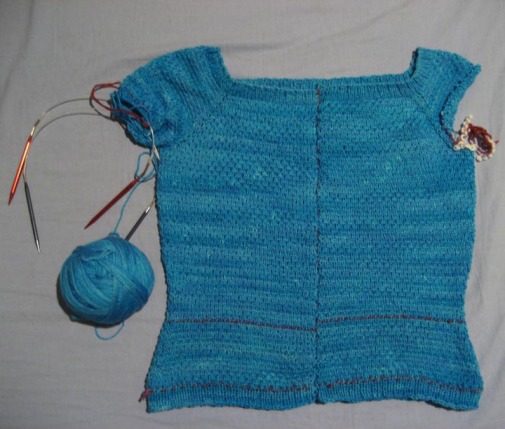
kaleidoscope-cardigan-WIP
Pattern: Kaleidoscope by Sarah Sutherland, published in MagKnits [free]
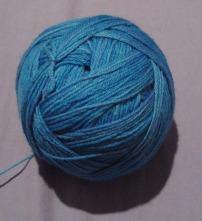
Yarn: Knitpicks Bare Merino Wool-Silk Blend Fingering Weight (70% merino wool / 30% silk 440 yds / 100 gram hank ) which I hand-dyed using blue food coloring. 200 grams (880 yds) will be enough for this sweater, which makes it cheap ~ about $13!
~

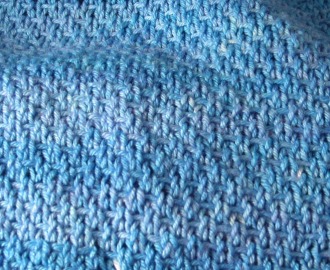
I’m maybe half-way through this cardigan, and I am loving the color of the yarn, as well as the slip stitch pattern that I decided to substitute in for the stockinette. When I dyed this yarn, I was somewhat disappointed by the result, as I was going for a deeper, pair of blues, but the result, knitted up is vibrant (which I like), and has subtle color shifts which I am very happy with in the knitted result. I’m not a fan of the patchy, variegated way that space-dyed yarns often knit up, but the color and tonal differences in this dye job, combined with the interesting stitch pattern, seem to be subtle enough to be very pleasing, and give the piece depth, without making it stripy.

I knit it from the top down, instead of bottom up, as the pattern was written, because I wanted to be able to try on the most crucial part (the neckline) immediately, so I knew that my sizing calculations were working out, as I’m knitting at a slightly different gauge and in a different stitch pattern than the pattern was written for. So the process has involved a fair share of math!!

kaleidoscope-slstpatterndyedyarn-KPmerinosilk-blues

The Slip Stitch pattern is knit as follows on a 4-row repeat (but it’s really just 2 different rows, one of them just being straight purl, so it is VERY easy)

  • R1 (RS): *K1, Slip 1 stitch purlwise with yarn in front*
  • R2: Purl
  • R3: *Slip 1 stitch purlwise with yarn in front, K1*
  • R4: Purl

I found this pattern in Step by Step Knitting Stitch Patterns, by Kristina Bryszewski [1988, K.M.B. Publishing, Vancouver, BC]

Butter Clam Scarf

by Emily Wessel

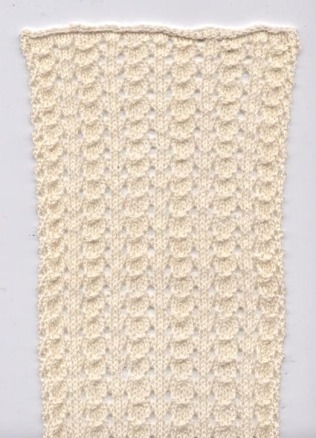
ButterClamScarf-lacepatternThis scarf began as a swatch, and just kept growing. I love the way the lace pattern is tiny, simple, and geometrical, yet very textural. It is a perfect first project for getting comfortable with lace knitting motions, as well as with lace-weight yarn. The lace weight merino wool is very stretchy, and relatively thick [for a laceweight!], making it easy and forgiving to knit – perfect for a first lace project. Plus at $2.50, the project is unbelievably cheap!
SIZE:
5 1/2″ wide by 68″ (5′-8″) long

GAUGE: Gauge is not really important in this case, just start knitting the scarf and see if you like the effect.

NEEDLES: I used a US#2 circular needle, but swatch and you will see what you like, but note that smaller needles create more contrast between the ‘solid’ parts of the lace and the eyelets.

YARN: Knitpicks Lace Weight ‘Bare Merino Wool’ (880 yards/100 gram hank). This is the undyed version of their ‘Shadow’ Lace Weight yarn, which comes in lovely colors, and 50 g hanks (440 yards/50 gram hank). The scarf I knit used approximately 45 grams of my 100 g hank (this translates to 396 yards, and the scarf is quite long).

YARN COST: $2.50 (Knitpicks ‘Shadow’ is currently $2.50/50 g hank)

SHELL LACE PATTERN:

Row 1: Knit
Row 2: Purl
Row 3: edge stitch, *K2, yo, P1, P3tog, P2, yo* repeat to last 3 sts, K2, edge stitch
Row 4: Purl

ButterClamScarf-laceTO KNIT SCARF:

Cast on 46 stitches using twisted loop cast-on.
Knit 2 rows in Stockinette Stitch.
Work scarf in Shell Lace pattern for 130 repeats, or until desired length.
Knit 2 final rows in stockinette stitch, and bind off using suspended bind-off (or basic bind-off worked very loosely, perhaps using larger needles)
Block and enjoy.

Note: I knit a scarf that is 6 repeats wide, however, if you prefer a narrower, more delicate scarf you could knit 4 or 5 repeats instead.