By Emily Wessel
This pattern is inspired by the excellent top down raglan pattern by Fran at martian mischief.
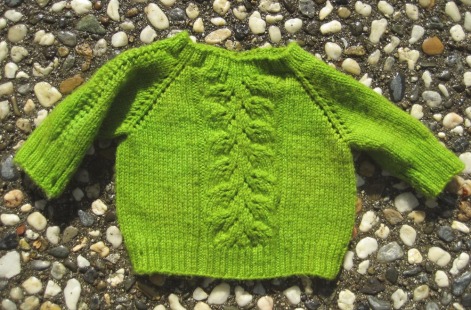
FITS:
Infant 6-12 months
Underarm = 19.5”, sleeve length = 8”
GAUGE:
5.25 st/inch (21 st = 4”) on US 5 needles in stockinette stitch
NOTE: if working with a different gauge, just make sure that neck hole is large enough (stretches to 18”) and just work to the right underarm dimension, and the sleeves will automatically be wide enough.
NEEDLES:
US 3 circular or DPN’s (for ribbing) and US 5 circular or DPN’s (for body)
The pattern starts at the neckline and works down, increasing along the raglan ‘seam’ lines, until there are enough stitches (at the underarm) to join the front and back panels together, and split off the arms and then work down the front and back and arms from there to the waist / wrists.
If a larger sweater is desired, simply continue the pattern for longer before splitting arms off, and this will result in a larger underarm dimension, and wider sleeves. Then simply knit to the desired length in body and sleeves.
YARN: I used Knitpicks Bare Superwash Merino, which is the undyed version of their Knitpicks Swish DK yarn. It is a DK weight yarn (246 yards/100 gram hank). The sweater used 1 hank plus a very small amount more (300 yards would definitely be enough). It is very soft and spongy, and the washing instructions suggest Machine Washable/Tumble Dry Low. After knitting, I hand dyed it using Wilton’s Icing Dyes (leaf green, plus a little bit of red)
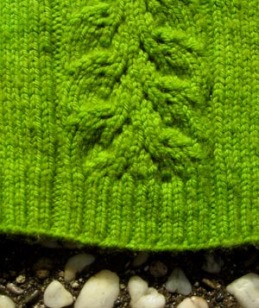
LARGE LACE PANEL (center front and back):
Over 21 stitches (knit on the round)
R1: P2, K3tog, K2, yo, K1, yo, K3, yo, K1, yo, SSSK, K4, P2
R2 and all even rows: P2, K17, P2
R3: P2, K10, yo, K1, yo, K1, SSSK, K2, P2
R5: P2, K4, K3tog, yo, K1, yo, K3, yo, K1, yo, K2, SSSK, P2
R7: P2, K2, K3tog, K1, yo, K1, yo, K10, P2
R8: As R2.
Repeat these 8 rows for pattern.
SMALL LACE PANEL (along arm):
Over 5 stitches (knit on the round)
R1: K2tog, yo, P1, yo, K2tog through back loops
R2: Knit all stitches
Alternate these two rows.
* I find that to make even yo’s with this pattern, it is necessary to loop over twice in each case, and then in the following row, only knit into one of the two loops formed. I don’t know why, but I think it has something to do with transitioning from a purl to a knit stitch with a yarn over between.
** I found that this lace pattern ends up being depressed, so I actually suggest that you choose a different 5-7 stitch lace pattern to use on the arms, and swatch to make sure that you like the effect before starting the sweater.
KNITTING SWEATER:
Cast on 66 stitches on smaller needles, join to work on round.
Work 8 rounds in K2, P1 rib.
Switch to larger needles.
Place different colour marker at start of row, K11, place marker (this will be right arm), K22, increase 1, place marker (this will be front panel), K11, place marker (this will be left arm), K22, increase 1 (row count now 68, with 11 st each per arm, and 23 st each in front and back panels)
START LACE PATTERNS & INCREASE ROWS:
From neckline ribbing to underarm, alternate rows, working one ODD row incorporating odd lace pattern rows (rows 1,3,5, or 7 of lace patterns specified above) then one INCREASE row, which will add stitches along the raglan ‘seam’ lines (during which you will knit all stitches across the lace panels).
Odd Lace Row:
K6, work small lace pattern over center 5 sts, K6, slip marker, K1, work large lace pattern over center 21 sts, K1, slip marker, K6, work small lace pattern over next 5 sts, K6, slip marker, K1, work large lace pattern over center 21 sts, K1
Increase Row: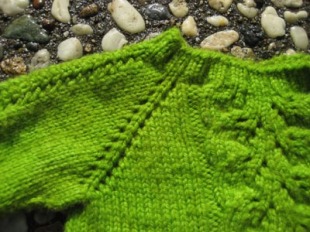
K1, yo, K to last 1 st before marker, yo, K1, slip marker, yo, knit until lace pattern, then P2, K17, P2, then knit until marker, yo, slip marker, K1, yo, knit to last 1 st before marker, yo, K1, slip marker, yo, knit until lace pattern, then P2, K17, P2, then knit until marker, yo, slip marker. (this increases 8 sts)
Alternate these two rows until front and back panels measure 9 ½” wide (for me this was when front and back panels had 49 stitches).
Put right sleeve stitches on scrap yarn, cast on 3 stitches, work across front panel, put left sleeve stitches on scrap yarn, cast on 3 stitches, and work across back panel.
Work body even from underarms to desired length minus ribbing (about 8” from shoulder). Work in K2, P1 ribbing to desired final length (about 9-9 ½” total from shoulder) – *across lace panels, to maintain purl columns, work P2, then *K2, P1* for 17 sts, then P2*. Bind Off all stitches.
SLEEVES:
Put stitches from holders onto 2 circulars or DPNs
Start round at back of sleeve, knit around, maintaining lace pattern, and pick up and knit one stitch for each cast on stitch at underarm, plus 2 extra stitches, one on either side of picked up stitches.
Work even (or decrease a few stitches as desired) until desired length minus ribbing (about 6” from shoulder). Switch to K2, P1 ribbing, and smaller needles, and work to desired length (about 8” total from shoulder) (* across lace panels, for symmetry, work P1, K3, P1*) note, that to achieve correct multiple for ribbing it may be necessary to decrease a stitch or two.
FINISHING: Weave in yarn ends, wash, dry, and enjoy!


